Seed 1cryo-tube HEK293-RRP6-3xflag cells in 8 T-25 flasks
(time until confluent depends on CO2 in incubator- @8% takes 3days until ~80% Confluent)
Preparation of DOX (serial dilution)
- make 5mg/ml dox stock
- Add 10ul of the 5mg/ml in 4990ul DMEM—> final conc.: 10ug/ml
16/4/21- Dox induction:
0ng/ml; 1ng/ml; 2ng/ml; 3ng/ml; 4ng/ml; 5ng/ml; 6ng/ml; 7ng/ml
17/4/21-Cell harvesting
Add 2ml of ice cold PBS and scrape the cells-> collect in 2ml tube
Split the cells in half (1ml to each tube) for each treament
Cantrifuge cells at 1000g 4C for 5min
Remove supenatant
Add 200ul of lysis buffer (with protease inhibitors 100x–>1x)/ 2 salt concentrations 300mM and 700mM for each treatment
vortex full speed 10-15sec
Sonicate: Settings ( 4 Amp, 5x1 seconds ~ 15J)
Centrifuge the lysate at 20K 10min 4C
Take supernatant to a new tube
Do a Pierce BCA assey to measure protein content
Measurements (mg/ml):
300mM
0-5.14
1-4.15
2-4.63
3-3.94
4-4.56
5-4.96
6-5.29
7-4.82
700mM
0-4.56
1-4.56
2-4.22
3-4.33
4-4.8
5-5.58
6-4.82
7-5.4
30ug of lysate from each sample used
Use the V=m/C (m is the amount of protein going to each well-constant-, C is the concentration of my protein sample)
Take the appropriate amount of protein and add 4x(1:4)LDS, DTT (stock concentration is 1M, final concentration should be 50mM DTT, so it’s 0,5 ul of DTT in every 10 ul of loading volume).
–Also I recommend you to prepare Master Mix to avoid pipetting mistakes and reduce the time you spend to prepare samples. For example, you have 10 samples, so you would prepare a mix for 11 or even 12 samples because the pipetting process has some errors. Mix the DTT, 4xLDS and mQ (you will add mQ in the Master Mix if all of your samples have the same concentration otherwise you should add an appropriate volume of mQ to each sample). Since Master Mix is prepared you would use one clean tip to add the same amount of master mix to all clean eppendorfs. And then you will add samples and pipetting up and down to mix them well.
Then heat samples at 70C for 10’ (no shaking)
Spin max spin on top bench centrifuge to reduce bubbles
Loading volume 10ul in 26-well Bis-Tris 4-12% gel
Remove the comb (gently) out from the cassette by using both thumbs, wash the wells with running buffer and dispose (2x), remove the tape at the bottom of casette, place the cassette according to instruction below. Use 1x MOPS and 350ul ANTIOXIDANT for small gel, double this in big gel.
Loading samples: always write the order before you load them to prevent confusion. Here is the video to remind you how to prepare tank for electrophoresis https://youtu.be/jQQ85_5CsdE
Don’t forget to load marker (usually 2nd well) ~ 5 ul (name of marker (our “standard” marker)
Load 1.1x LDS in empty wells (first and last) to run gel equable The voltage and time would depend on which separation you want to reach. (e.g. start at 160 V until the samples reach the uppermost ledge(?), then raise the voltage to 200 V.
Use appropriate “SDS-PAGE”loading pipette tips
Run the gel until the 37kDa band is a the bottom- for better separation
When the gel is almost ready, prepare the membrane. 1. Dump MeOH on it, remove it, just to make it wet 2. put in the water for 5 min on the shaker, remove water, 3. put in a transferring buffer for 10 min on a shaker.
Prepare a sandwich BEFORE (transferring buffer in tray) you open the cassette with gel. Keep gel in a transferring buffer until everything for transfering will be ready. Otherwise gel will dry. Put the transparent side down and use 2 filter papers to each side. Gel towards (-) side and on top of it the membrane (+) side.
Open the cassette with a spatula, by using a blade cut the upper wall of wells & cut the bottom where the gel cassette has a slot (you removed tape from this part). Then wet the thumbs and gently unstick the gel from the plastic & flip it on the membrane.
For the big transferring tank - use the ice block.
Put the star magnetic bar inside.
Put the ice around the tank, place it in a cold room
Wet transfer, 70V for 1.5hr
Transferring buffer reusable
Prapare 5% Milk (2,5 g for 50 ml of TBST buffer)
Blocking- Leave the membrane in milk for 1 hour- or overnight if its at cold-room (4 C)
Wash after milk with TBST (just quick wash)
Washes (prefer the horizontal platform shaker)
1st Ab (abcam 50558) - 1:1000 dilution - overnight in cold-room or 1 hour in RT. Shaking is required. Wash 10 min 3 times. ! Primary antibody stock in the -20C, in the cooler box/ diluted are in fridge ! Change the plastic container (after 2nd wash) because primary antibodies stick to walls- wash the used one with detergent ! Primary antibodies can be re-used up to ~6-7 times, so don’t dump them
2nd Ab - 1:10.000 dilution (e.g. for 20ml of BSA/TBST/NaN3 use 2ul 2nd Ab) - 1 hour in RT. Shaking is required. Wash 10 min 3 times. ! Secondary Ab stock in the fridge, ! Peroxidase labelled anti-(whatever the 1st Ab is)
19/04/2021-For membrane visualisation
-Spread HRP substrate (2-3ml) evenly around the membrane with pipette (cover whole membrane)
-Before i place it to the visualiser, make sure i drain the HRP substrate by sliding the membrane to the wall of container and wiping the membrane circumferentially with paper- also remove drops from membrane, if needed
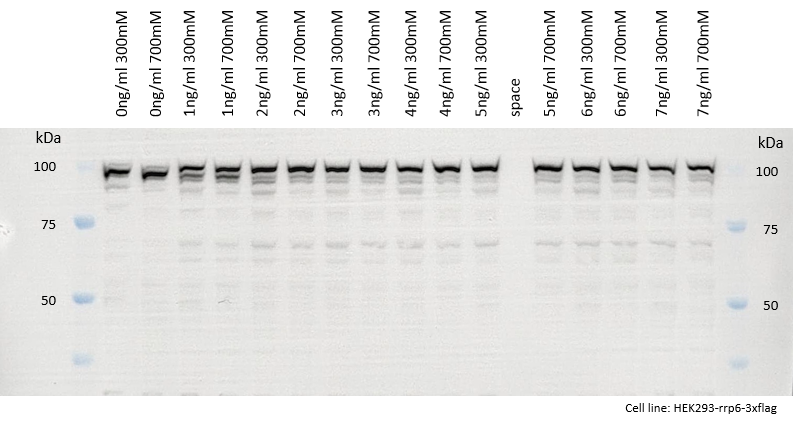
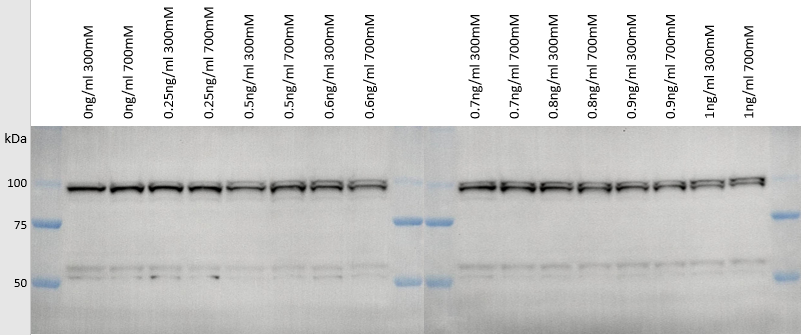
Results:
0-1ng/ml gradient
0-7ng/ml gradient